How and What to Submit
The following are instructions on how to submit assignments in Comm 305. Please click on each section to expand it.
Submission Template
Illustrator-only projects (Stickers, Watch, Gig Poster)
Download the submission template here.
Motion Graphics Project
Download the submission template here.
There are different submission templates for different projects. Follow the instructions within the Ai submission template to create multi-page PDFs for each submission dropbox in I-Learn.
Animation Project
Download the submission template here.
Submission Instructions
Weeks
In each unit (or project) there are two weeks, the first week is called the "draft week" and the second is called the "final week"
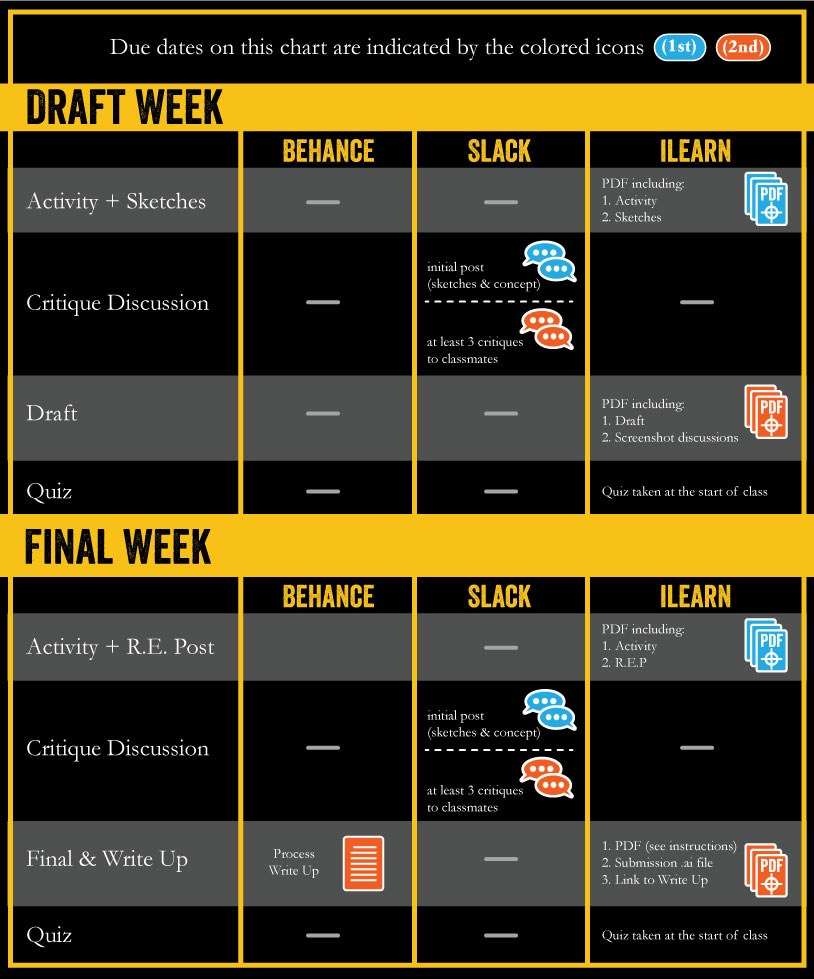
Where to Submit
There are three places to submit:
- I-Learn
- Always submit a single PDF (with multiple pages)
- You will often be asked to screenshot your slack and blog posts and include them in the PDF
- Do not zip anything
- To submit a link, you must first submit the PDF, then I-Learn will allow you to copy and paste the link
- After pasting your link, press space to make it clickable.
- Slack
- The course slack group: vectorgraphics.slack.com
- Initial Posts of sketches and concepts
- Critique replies to your classmates' posts
- Screenshot your posts and replies as you go. Collect them into the Submission Template PDF for submission at the end of each week.
Discussions Critiques (Slack)
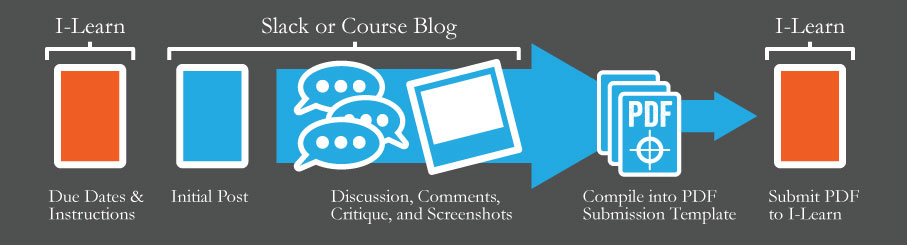
Description
These critiques will happen in the course Slack group. Each week, we will start a new discussion in the corresponding channel. The primary reason for discussions is to give and receive critique as your continue to share your progress throughout the week.
- An initial post with your idea or concept for your project
- Include image of your sketches
- Explain your sketches and concept
- As your project progresses, add additional comments to your post with images of your work
- Comment on a minimum of three of your classmates’ posts
- Start with classmates’ posts that have fewer comments
- Responses to comments on your own post don’t count
- Respond professionally and be helpful
- Offer critique and feedback
- You may choose to SHOW what you’d change in an image
Due Dates
The initial post for each week is due by the first due date along with a screenshot of the post in your Submission Template PDF. Screenshots of discussion (replies) should be turned in with the draft or final on the second due date.
Submission
The initial post is due on Slack. A screenshot of your post is also due on the first due date of the week in the Submission Template PDF. Take the week to discuss and then compile screenshots of your replies into the Submission Template PDF and submit it to I-Learn. (TIP: Starring your replies makes them easier to find later)See Submission Instructions for details.
Note
- Please reply a few days BEFORE the deadline to allow for a proper discussion that will aid you and your classmates
- Critique at least 3 of your classmates’ work offering suggestions to improve and pointing out flaws in their work.
- Be kind, but honest.
- Critique the work and not the person creating it.
- Statements like, “Looks good!” are inadequate.
- There is always something to be improved.
Reverse Engineer Posts
 Description
Choose a professionally produced vector graphic and create a Reverse Engineer Post (R.E.P) Write-up with Draw-overs to analyzing it. Use at least 3 design principles (such as color, value, contrast, hierarchy, and other principles you may remember COMM 130) to reverse engineer the vector graphic. Avoid covering techniques that do not translate across other mediums or are not considered a design principle, such as using a mockup, creativity, stokes, etc. Use draw-overs showing what you’re describing in your short, typed description. This assignment will be created on the designated space of the submission template.
Due Dates
The R.E.P. Post is due on the first due date of the final week of each unit.
Submission
Export the submission template according to the instructions in the template and submit to I-Learn.
Note
Please note the following specific instructions about blog posts.
Images
Take a screenshot of the graphic you're analyzing and do several "draw overs" to visually show what you're describing in text.
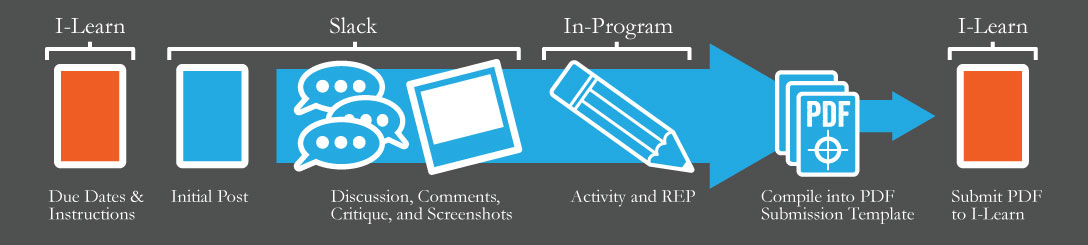
Activities
Description
Most weeks will have an activity. Follow the instructions on each activity and submit them with your Submission Template PDF.
Go to the activities page for instructions on each activity.
Due Dates
The activities are due by first due date as part of the Submission Template PDF in I-Learn.
Submission
Submit a screenshot of your completed activity with your other assignments for the due date in the Submission Template PDF
Sketches
Description
At the start of each project, you should sketch to help you develop an idea and solve the visual problems of composition. You should complete a minimum of 25 sketches for each project. These can, but do not have to, include thumbnails, roughs, layout comps and value comps.
Due Dates
The initial Slack post of your sketches for each week and a screenshot of your post is due by the first due date of the draft week.
Submission
Use the Submission Template PDF to submit a screenshot of your sketches post.
Note
- Sketching should become part of your process, not something you do to check a box.
- If you're struggling with something during the creation of your image, try sketching.
- Sketching should not be done digitally.
Drafts
Description
The draft of your project should meet 100% of the requirements of the project, but will still have some room to improve based on critique. The draft will be completed in Adobe Illustrator (or Adobe After Effects for the Animation project).
Due Dates
The draft is due on the second due date of the draft week.
Submission
Submit a screenshot of your vector draft as part of the Submission Template PDF
Course Due Dates
Due Dates
- Each week has two due dates labeled first due date or (1st) and second due date or (2nd).
- (1st) is by Tuesday at 11:59 pm mountain time
- (2nd) is by Saturday at 11:59 pm mountain time
Project Final & Write-up
Project Final & Write-up
Description
The final is the culmination of all your work for that unit. In other words, it is the finished product. The final should be displayed in a write-up on behance showing the narrative of your creative process.
Due Date
The final and write-up are due by the second due date of the final week of each unit.
Submission
Please submit the following:
- The entire Submission Template PDF
- Submission-ready .ai file
- Working Link to blog post in the comments
Submission file
Your working file is the .ai file that you create the image in. Your submission file is the file that you submit and/or pass on to others. Your working file can be a mess, but your submission file must be clean, organized and free from anything unnecessary. This means that you have named and organized objects, groups and layers and deleted any extra objects, paths, anchor points or artboards. A submission file will not have extra empty art boards.
Write-up (case study)
Images
Make sure to only upload web-optimized images (jpgs or pngs). Do NOT use PDFs, .AIs or other file types not conducive to a good user experience. Typically, larger images that do not have to be clicked on to see them are a much better way to go than thumbnails.
You may choose to take a screenshot of the graphic you're analyzing and do several "draw overs" to visually show what you're describing in text.
Text
You should type your text into the text box. In other words, do not post an image of a paragraph of text. The search engines cannot read images and won't know what you're saying (bad SEO).
Title
The title should be written as a blog post title. Choose something engaging and descriptive. Avoid using titles like "Icon Assignment by John Doe"
Project Rubric
Concept
- Interesting and engaging
- The image clearly communicates the concept in a creative, memorable or clever way
- The concept is appropriate for the assignment (target audience, project objectives)
Craftsmanship:
- The image looks finished and professional.
- There are no stray anchor points, reversed handlebars, awkward curves, too many anchor points and the anchor points are not placed in awkward places.
- The shapes are all closed and there are no unintentional “loose ends.”
- If there is a stroke, it looks professional is implemented well as part of the illustration.
- Any gradients are subtle and not distracting.
- The layers, groups and masks are organized well and named logically. The file could be used by another designer with no confusion.
- The document color mode is appropriate for the intended output (CMYK for print & RGB for screens)
- Fonts are outlined
Design, Typography and Color rules are implemented well.
Write-Up Examples
Student Examples
Each project has at least one Pinterest board associated with it. Pins on those boards with “by student” in the description will link to that student’s write-up of their project.
Professional Examples
Please take a moment to look at these examples.
- Asun Asyar (great example!)
- Creature Box (good example of showing the process, I’d like to see a little more narrative written than they do here)
- Krolik (great example of progression through the idea)
A note on photographing sketches:
There are a lot of different ways to do this. There are no “right” ways, as long as it looks good, you’re good to go. One very interesting way to do it though is to show the tools and surroundings with your sketchbook. The idea is to show that it was done on paper first. People really value traditional work, even if the end result is digital. Take a look at these examples (these are not good write-ups, just a good examples of interesting ways to photograph your sketches)
- Various Work (showing tools and surroundings)
- Never let go (close up with torn edges)
- icons collection (showing tools, surroundings, and close-ups)
Write-Up Rubric
Remember, each person’s write up or case study will be different, but they all should have a narrative of the process and at minimum, have the following:
The final image should be a professional quality polished image presented in the best light possible. The write up should tell the story of the creation of the image and give us a glimpse into your process. We should be able to see the concept develop throughout the narrative. At a minimum, the write-up will include:
- a description of your concept and objectives
- an image showing your sketches
- a few lines about your sketching process and your thoughts/reasons/development/etc in the sketches shown.
- an image of your vector draft(s)
- a few lines describing how you incorporated the feedback you received
- your final image
- a few lines defending how your image meets the objectives
Consider this write-up an exercise in professional communication. Feel free to let your personality show through, but put your best foot forward in your writing. Often, process write-ups posted to your blog and tagged correctly will be the catalysts to launch new client and employer relationships. Don’t let poor writing kill a relationship before it starts.
Video Tutorials
The following videos may be helpful in explaining how to do many of the things mentioned above. NOTE: if there is a conflict in what the video says and what the above instructions say, please follow the above instructions.
Types of Sketching
Types of Sketching
The following process will help you sketch in a creative and systematic way to generate ideas and good composition.
Submitting to Dropboxes
Submitting to Dropboxes in iLearn
Multiple Page PDFs
PDFs: Creating Multiple Page PDFs
NOTE: illustrator will export artboards as pages in the PDF in the order that they are listed in the artboard panel.